Saturday, September 26, 2015

September 26 Update

1932 Curtiss Wright Travel Air 12W
What a great time and great weather we had for the MAAC Fly-In at Brodhead.  If I counted correctly, I gave 16 rides in the Curtiss Travel Air and some air-to-air work with EAA for a future magazine article on the airplane. A lot of hours in the old bird, but I can't complain - it was fun!

Our Board of Directors and Board of Trustees for the Kelch Museum met, and we decided to go full-speed ahead on fund-raising for a new building.  Our curator, Pat Weeden will begin work on this.  Please consider donating to the future of this great museum and its fine collection of antique aircraft.  You can go to the Alfred and Lois Kelch Aviation Museum website to see how.

Then it was back to work on the L-P....
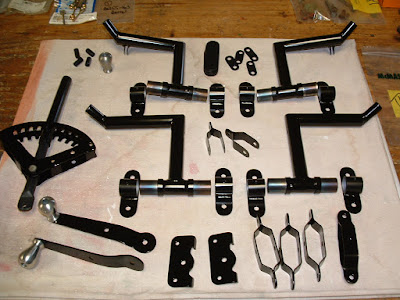

Misc. parts painted

Completed throttle levers
I got the rudder pedals I had previously fabricated plus some other misc. parts painted.  I like to use polyurethane for stuff like this for the durability, but don't like the glossiness.  So I use a little flattening agent in the paint to take away just a tinge of the gloss, which in my opinion, looks a whole lot better.


I made new throttle levers too.  The original ones were just too pitted from corrosion.  The aluminum knobs are original and cleaned up just fine.


Wings off and back on storage racks

Fuselage mounted on rotisserie
Then it was time for a rather depressing part of the  restoration process - taking the airplane back apart.  I had done all I could with the wings on - all the controls made and run, etc.  It sure comes apart a whole lot easier than it goes together!

With the wings off, I can focus on trial fitting everything in the fuselage:  fuel tank, seats, engine controls, sheet metal, etc, etc.


Before I get back on the airframe, I've been anxious to do some more work on the OX-5.  I'm sorting thru Miller overhead now, getting a good set ready for nickel plating and then final assembly.
Miller overhead

If you are not familiar with the Miller setup, it was an improvement that came out for the OX-5 in the 20's.  Its main improvement was the roller rocker arm which helped eliminate side-load on the valve stems, causing premature valve guide wear.  The rest of the components are also more heavy-duty than stock and allow everything (except the valve guides and stems) to be lubricated with grease.  Better lubrication is the result vs. manually oiling these components prior to each flight.

Miller actually made available 2 different versions:  One was just a roller rocker arm that was a direct replacement for the stock one.  It still had to be manually oiled, but offered the improvement of the roller.  The second version is the one shown and discussed above.  This is the preferred one as it has the more heavy-duty components and the ability to be greased.  

Miller also made other improvements such as 3-ring pistons.  You can go back to an earlier post where I talk in length about the short-comings of the stock pistons.  It didn't take long for manufacturers, like Miller, to improve on the Curtiss design - less friction, better oil control, more RPM.  This is why I had pistons made (with 3 rings) instead of using the original ones.


Getting the wings off also gave me space to focus more on the engine work.  I would like to have the engine done this winter.


So there you go - proof that I haven't been goofing off these past couple of weeks!  Stay tuned for an update soon - I'm just not sure what!


Friday, September 4, 2015

September 4 Update - Rudder Controls

Lots of things done the last couple of weeks...

Struts for horizontal stabilizer

Struts attached to tail


Here I thought I was done making all the struts, but forgot I had to make the ones that brace the horizontal stabilizer.  These also move with the stabilizer as the trim is adjusted.  It's the same strut material that the aileron slave struts were made from


With the aileron and elevator cables done, it was also time to begin work on the rudder controls.  

Old floor temporarily installed
Cindy trying it out for size


I was fortunate to have the old floor so I could check fit of everything.  I temporarily installed the original rudder pedals with drywall screws (that ought to work, right!!) then made mock-up cables like I did for the ailerons.  I still need to rig the front pedals.  There will be short inter-connect cables between the front and rear pedals.


While I had the floor in, I installed the seat and had Cindy crawl in and give it a try.  

Should be flying in a couple of weeks...


New Floor
Once I was satisfied with the fit of everything, I could make a new floor.  The floor is in 2 pieces as seen in this photo.  I chose not to use aircraft plywood, because I didn't want it to look too perfect.  If you pay attention to how many of these old aircraft were made, very little was wasted.  Most of the structural components were made from high-quality wood, but the non-structural ones were made from just about anything.  I even have an original wing rib that was made from part of a shipping crate with the Lincoln-Page address printed on it!

So I wanted some variable grain visible in the wood.  I found a nice piece of marine plywood in our local home center that had just the grain pattern I was looking for.  Marine plywood is an OK product for non-structural parts (like the floor) as the glues that are used are weather resistant.  After adding the same reinforcements that the original had, I gave it a couple coats of varnish and it turned out looking great.

All the new components cut and ready to be welded together.
Original pedal shown to the left.

New pedals after being welded


I had the original pedals, but was missing one.  Most were rather corroded so I decided to make all new ones.


Close-up of pedal and mounting brackets.


The brackets that mount the pedals and allow them to pivot are shown in this photo.  The short length of tubing is brazed to the flat piece.  The originals were done this way, probably so the excess heat of welding them on would not distort the ID of the tubing.


With everything now fabricated, the parts can be painted.  I also need to make the final rudder cables - they will be wrapped and soldered like everything else.

In the meantime, our favorite fly-in the year is coming up next weekend.  The Midwest Antique Airplane Club (MAAC) event at Brodhead.  We'll be there Friday thru Sunday.  I will be giving lots of rides in the museum's Curtiss Wright Travel Air and just hanging out with all our friends.  If you are there, look me up and say hi!