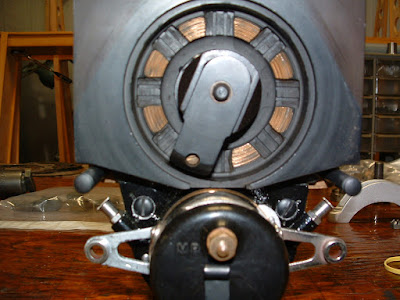
It was time to finish testing and install the magneto. I thought I would devote this post to step-by-step installation of the Berling magneto and some important things to watch.
 |
| Running on the test stand |
 |
| Screw that locks moveable breaker contact |
After about 2-1/2 hours, several of the contacts quit sparking and kept getting worse. When I removed the breaker cover, the points were closed! Not sure what happened, I readjusted them and after about 1/2 hour it happened again. I discovered the screw that locks the moveable breaker contact from turning has to be very tight to lock the contact. I was not getting it tight enough, so the contact moved closed over time. I have about a half-dozen other contact assemblies, and all of them had screw slots that were very worn and stripped. Makes you wonder how many OX-5 powered airplanes went down because of this very reason!?
 |
| New lock screw on right, 6-48 thread |
The screw is an odd size, a 6-48 thread. Fortunately, this is a common firearm size so they are easy to come by. The newer screws have a nice deep slot which makes tightening them easier.
 |
| New lock screw installed in breaker assembly. |
Once the contact was properly locked, I got about 6 hours of run-time with no other issues. I feel pretty good about using this mag, although regular cleaning and inspection will be necessary. Berling made this easy as getting to these critical areas can be done in seconds.
Then it's time to prep the mag for assembly. The first thing to do is install the drive coupling. The drive lugs on the magneto side, couple to drive lugs on the engine side that are cushioned with what the Berling parts catalog calls "shock absorbers". Obviously, after sitting for nearly 90 years, mine were dried out and hard. I chose to make new ones from urethane - a very resilient rubber-like material that is oil resistant. It's often used as die springs in punch press dies. I made them from a 60 shore-A durometer which seemed about perfect.
 |
| Cutting out the center with a hole saw. |
 |
| Followed by cutting them into segments. An old one is shown on the left. |
 |
| Drive coupling installed |
The drive coupling can then be installed on the mag. It is held on with a nut, locked with a screw, and the screw safetyed with a locking clip.
 |
| Studs that locate mag on mounting plate |
4 studs are then screwed into the base of the magneto. These don't secure the magneto, just position it and keep it from moving around on the mounting plate.
 |
| Locating distributor segment for cylinder #1 |
 |
| Positioning distributor finger over this segment |
The mag then has to be set so the distributor finger is ready to fire cylinder #1 as the points are just opening.
 |
| Aligning timing marks on drive gear and cam gear |
 |
| Magneto drive gear bearing |
Fortunately, mine was stamped which made timing very easy. The timing is set at 32 degrees BTDC. Checking with a typical magneto buzz box, it came out perfect. Make sure you do this with the advance lever in the full-advance position.
I can't begin to guess how many magnetos I've installed. This was by far the easiest - no adjustments required. Not bad for 100-year old technology!
You'll also want to make sure you install the drive gear bearing to hold everything in position while you are checking the timing.
 |
| Hold-down strap installed which secures the magneto |
 |
| Oil retaining cover with new felt seals |
 |
| Cover properly secured |
Then, a pair of oil retaining covers are installed over the magneto drive gear. These have felt strips that prevent oil from leaking past the shaft. I made new ones from wool felt.
The screws to secure these covers are unique. They are like a fillister-head, but the heads are square as you cannot get to them with a screwdriver.
 |
| Rear cover and tach drive installed |
The rear cover and tach drive can then be permanently installed. Early photos show the single wire method of safetying with 22 ga. soft steel galvanized wire. That is what I used.
Note, the tach drive is not safetyed yet as I'm not sure of the orientation until I run the tach cable.
 |
| Harness installation |
Finally, the harness is installed. I used all original components: the tubes, terminal ends, etc. Only the wires are new manufacture, cotton covered, lacquer coated, 9mm spark plug wire.
 |
| Original cable clamp |
The cable clamp is also an original part.
While on the test stand, I checked the coming-in speed. It was 70 RPM at full advance and 220 RPM at full retard. This is excellent! Remember, this magneto operates at 2X engine speed, so at full advance, the magneto is fully sparking at 35 engine RPM. Quite remarkable!
Fuel tank done by next post - maybe...Check back in a could weeks to find out!
Hello Greg. I would be very interested in talking to you about Berling Magneto set up. We are working on a similar project. Have cast new one rubber couplings, and I would like to ask about your firing order. Thanks. John Gaertner Blue Swallow Aircraft, LLC (434) 295-7177
ReplyDelete